Quickstart
Create your first hypercert. This guide uses TypeScript and Node.js v20+.
Create an account
Sign up at certified.app. This gives you an AT Protocol identity and a PDS where your data is stored. (Already have a Bluesky or other ATProto account? That works too.)
Install dependencies
pnpm add @atproto/oauth-client-node @atproto/jwk-jose @atproto/api
Building a React app? Use @atproto/oauth-client-browser instead, alongside @tanstack/react-query for data fetching and caching.
Authenticate
Authentication uses AT Protocol OAuth. Your app needs a client metadata document hosted at a public URL:
import { NodeOAuthClient } from "@atproto/oauth-client-node";
import { JoseKey } from "@atproto/jwk-jose";
import { Agent } from "@atproto/api";


const client = new NodeOAuthClient({
  clientMetadata: {
    client_id: "https://your-app.example.com/client-metadata.json",
    client_name: "My App",
    client_uri: "https://your-app.example.com",
    redirect_uris: ["https://your-app.example.com/callback"],
    grant_types: ["authorization_code", "refresh_token"],
    scope: "atproto transition:generic",
    response_types: ["code"],
    application_type: "web",
    token_endpoint_auth_method: "private_key_jwt",
    token_endpoint_auth_signing_alg: "RS256",
    dpop_bound_access_tokens: true,
    jwks_uri: "https://your-app.example.com/jwks.json",
  },
  keyset: await Promise.all([
    JoseKey.fromImportable(process.env.PRIVATE_KEY_1, "key1"),
    JoseKey.fromImportable(process.env.PRIVATE_KEY_2, "key2"),
    JoseKey.fromImportable(process.env.PRIVATE_KEY_3, "key3"),
  ]),
  stateStore: { /* ... your state store implementation */ },
  sessionStore: { /* ... your session store implementation */ },
});


// Redirect the user to their PDS to authorize
const url = await client.authorize("alice.certified.one");


// After the user approves, exchange the callback params for a session
const { session } = await client.callback(new URLSearchParams(callbackQuery));


// Wrap the session in an Agent to make authenticated calls
const agent = new Agent(session);
See the AT Protocol OAuth documentation for full details on client metadata, session storage, and keyset configuration. For further info on how to set up OAuth you can check out AT Protos node.js implementation tutorial or the scaffold app.
Create your first hypercert
The activity claim is the core record — it describes what work was done, when, and in what scope. Here's how each field maps to the activity lexicon:
- Contributors are embedded directly in the activity claim as a
contributorsarray. Each entry has acontributorIdentity(inline DID string, or a strong reference to acontributorInformationrecord), an optionalcontributionWeight, and an optionalcontributionDetails(inline role string, or a strong reference to anorg.hypercerts.claim.contributionrecord for richer detail). - Work scopes can be a simple free-form string (
{ scope: "Documentation" }) or a structured CEL expression for machine-evaluable queries across the network. - Time is expressed as
startDateandendDatein ISO 8601 format. - Locations are separate
app.certified.locationrecords referenced from the activity claim. They support coordinates, GeoJSON, and other formats.
const result = await agent.com.atproto.repo.createRecord({
  repo: agent.did,
  collection: "org.hypercerts.claim.activity",
  record: {
    $type: "org.hypercerts.claim.activity",
    title: "NumPy documentation maintenance, Q1 2026",
    shortDescription: "Updated API docs and fixed 15 broken examples.",
    description: "Created 12 new documentation pages covering quickstart, use cases, evaluations, and architecture. Migrated from GitBook to a custom Next.js + Markdoc site.",
    workScope: {
      $type: "org.hypercerts.claim.activity#workScopeString",
      scope: "Documentation",
    },
    startDate: "2026-01-01T00:00:00Z",
    endDate: "2026-03-31T23:59:59Z",
    createdAt: new Date().toISOString(),
  },
});


console.log(result.data.uri);
// → at://did:plc:abc123/org.hypercerts.claim.activity/3k2j4h5g6f7d8s9a


console.log(result.data.cid);
// → bafyreiabc123...
Each AT-URI is a permanent, globally unique identifier. Other records (evaluations, attachments, measurements) reference your hypercert using its URI. The CID is a content hash that makes references tamper-evident. Save both — you'll need them to link other records to this hypercert. See the Activity Claim lexicon for the complete schema.
Add contributions
Contributors are embedded directly in the activity claim's contributors array. Each entry uses inline identity and role objects:
const result = await agent.com.atproto.repo.createRecord({
  repo: agent.did,
  collection: "org.hypercerts.claim.activity",
  record: {
    $type: "org.hypercerts.claim.activity",
    title: "NumPy documentation maintenance, Q1 2026",
    shortDescription: "Updated API docs and fixed 15 broken examples.",
    workScope: {
      $type: "org.hypercerts.claim.activity#workScopeString",
      scope: "Documentation",
    },
    startDate: "2026-01-01T00:00:00Z",
    endDate: "2026-03-31T23:59:59Z",
    contributors: [
      {
        contributorIdentity: {
          $type: "org.hypercerts.claim.activity#contributorIdentity",
          identity: "did:plc:alice123",
        },
        contributionWeight: "70",
        contributionDetails: {
          $type: "org.hypercerts.claim.activity#contributorRole",
          role: "Lead author",
        },
      },
      {
        contributorIdentity: {
          $type: "org.hypercerts.claim.activity#contributorIdentity",
          identity: "did:plc:bob456",
        },
        contributionWeight: "30",
        contributionDetails: {
          $type: "org.hypercerts.claim.activity#contributorRole",
          role: "Technical reviewer",
        },
      },
    ],
    createdAt: new Date().toISOString(),
  },
});
Each contributor entry has:
contributorIdentity— inline#contributorIdentitywith a DID string, or a strong reference to anorg.hypercerts.claim.contributorInformationrecordcontributionWeight— relative weight as a string (weights don't need to sum to 100)contributionDetails— inline#contributorRolewith a role string, or a strong reference to anorg.hypercerts.claim.contributionrecord for richer detail
Attach supporting documentation
Attachments link supporting documents, reports, or URLs to any record. Create an attachment record that references the hypercert:
await agent.com.atproto.repo.createRecord({
  repo: agent.did,
  collection: "org.hypercerts.context.attachment",
  record: {
    $type: "org.hypercerts.context.attachment",
    subjects: [{ uri: result.data.uri, cid: result.data.cid }],
    title: "Documentation site repository",
    shortDescription: "Source code and content for the Hypercerts Protocol documentation.",
    content: [
      {
        $type: "org.hypercerts.defs#uri",
        uri: "https://github.com/hypercerts-org/hypercerts-atproto-documentation",
      },
    ],
    createdAt: new Date().toISOString(),
  },
});
The subjects field is an array of strong references (AT-URI + CID). The content field is an array of org.hypercerts.defs#uri objects (for URLs) or org.hypercerts.defs#smallBlob objects (for file uploads). You can create multiple attachment records — one for the repo, one for the deployed site, one for a methodology document, etc.
Add a measurement
Measurements record quantitative data about the work. Create a measurement record that references the hypercert:
await agent.com.atproto.repo.createRecord({
  repo: agent.did,
  collection: "org.hypercerts.context.measurement",
  record: {
    $type: "org.hypercerts.context.measurement",
    subjects: [{ uri: result.data.uri, cid: result.data.cid }],
    metric: "Documentation pages written",
    value: "12",
    unit: "pages",
    startDate: "2026-01-01T00:00:00Z",
    endDate: "2026-03-31T23:59:59Z",
    methodType: "manual-count",
    createdAt: new Date().toISOString(),
  },
});
Required fields are metric, value, and unit. The subjects array links the measurement to your hypercert via strong references. You can attach multiple measurements to the same hypercert — one per metric.
Add an evaluation
Evaluations are third-party assessments of the work. They reference the hypercert via a single subject strong reference and are typically created by someone other than the hypercert author:
await agent.com.atproto.repo.createRecord({
  repo: agent.did,
  collection: "org.hypercerts.context.evaluation",
  record: {
    $type: "org.hypercerts.context.evaluation",
    subject: { uri: result.data.uri, cid: result.data.cid },
    evaluators: [{ did: "did:plc:ragtjsm2j2vknwkz3zp4oxrd" }],
    summary: "High-quality documentation with clear examples and thorough coverage.",
    score: { min: 1, max: 5, value: 4 },
    content: [
      {
        $type: "org.hypercerts.defs#uri",
        uri: "https://example.com/evaluation-report.pdf",
      },
    ],
    createdAt: new Date().toISOString(),
  },
});
Required fields are evaluators, summary, and createdAt. Unlike attachments and measurements, subject is a single strong reference (not an array). The optional score object takes integer min, max, and value fields.
What you've built
Your hypercert now has a complete structure:
Activity Claim (the core record)
├── contributors[] (embedded)
│   ├── Alice — identity: did:plc:alice123, weight: 70, role: Lead author
│   └── Bob   — identity: did:plc:bob456,  weight: 30, role: Technical reviewer
├── Attachment: GitHub repository link  ← strong reference (AT-URI + CID)
├── Measurement: 12 pages written       ← strong reference (AT-URI + CID)
└── Evaluation: "High-quality documentation" (by Carol)  ← strong reference (AT-URI + CID)
Contributors live inside the activity claim record itself. External records — attachments, measurements, evaluations — link to the activity claim via strong references (AT-URI + CID). The CID is a content hash: if the referenced record changes, the hash won't match, making the entire structure tamper-evident.
This is the same pattern described in the Core Data Model. As the hypercert grows over time, third parties can add measurements, evaluations, and more attachments — each as a separate record referencing your activity claim.
Create via the Scaffold App
If you don't want to write code, the Scaffold app lets you create a full hypercert through a guided wizard. Visit hypercerts-scaffold.vercel.app to get started.
Step 1 — Sign in
Enter your ATProto handle (e.g. yourname.certified.one or yourname.bsky.social) on the sign-in screen. You'll be redirected to your PDS to authorize the app. Once you approve, you'll land on the home screen with your DID and display name visible.
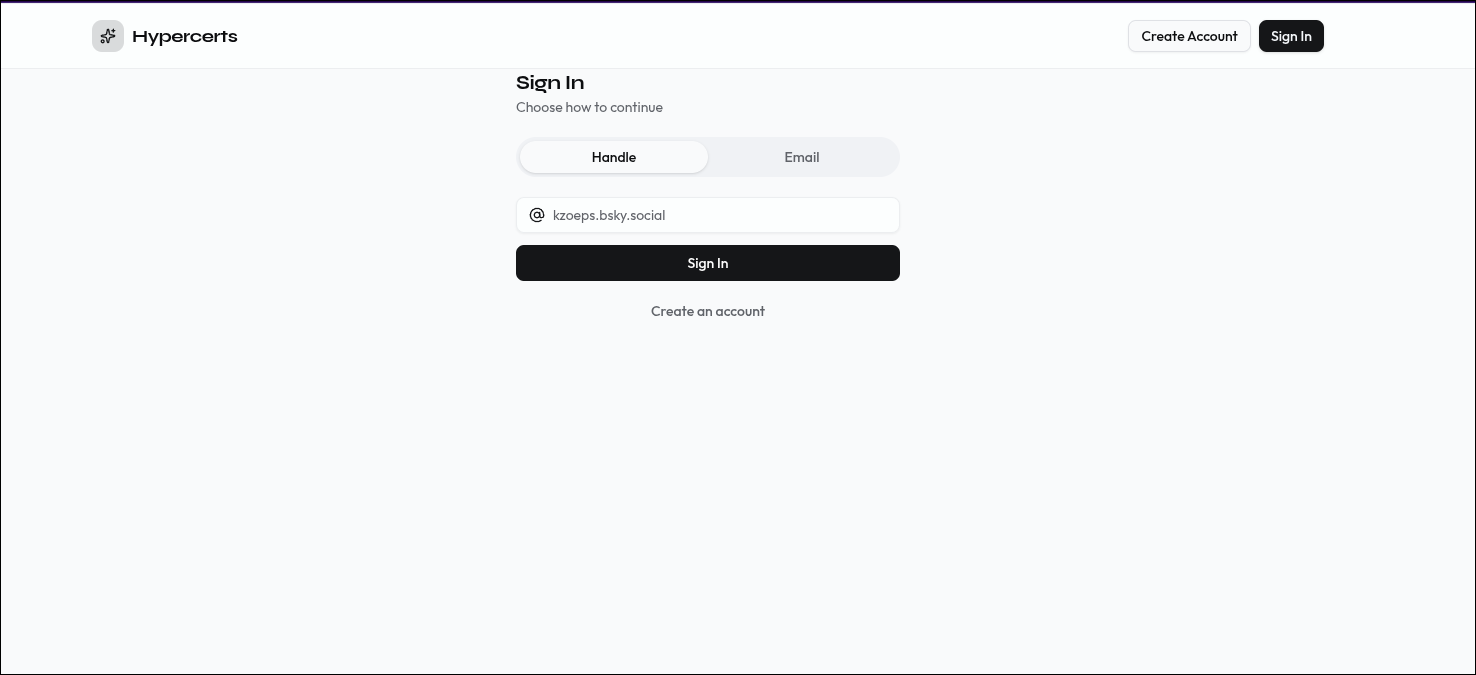 Enter your ATProto handle to authenticate via OAuth.
Step 2 — Basic info
Click "Create a new hypercert" on the home screen (or go directly to hypercerts-scaffold.vercel.app/hypercerts/create). This opens a multi-step wizard. The first step collects the core fields that form the org.hypercerts.claim.activity record on your PDS.
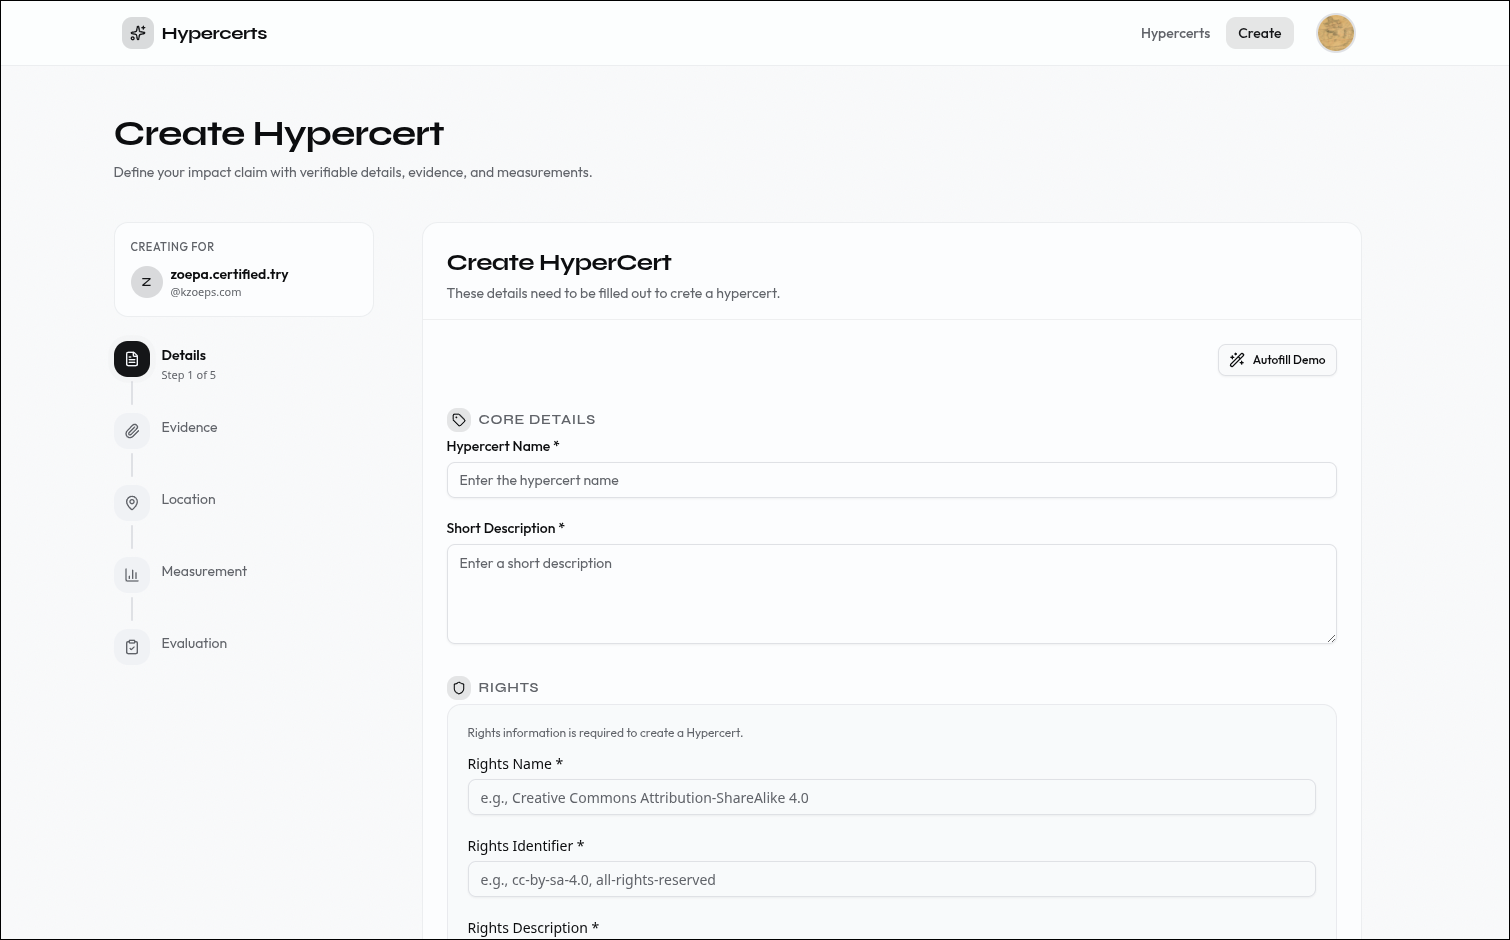 Step 1: Define the basic claim — what work was done, when, and in what scope.
| Field | Description |
|---|---|
| Title | A specific name for this piece of work. Be verbose — a project may have many hypercerts over time. Max 256 characters. Example: NumPy documentation maintenance, Q1 2026. |
| Short description | A 1–3 sentence summary suitable for card previews and list views. Max 300 characters. |
| Description | A longer narrative of what was done, by whom, and how. Supports rich text. Max 3,000 characters. |
| Work scope | One or more tags that precisely define what work is included. Multiple tags are conjunctive — e.g. Trees + Germany means only tree-planting in Germany. Leave empty for an unconstrained scope. |
| Start date | When the work began (ISO 8601). |
| End date | When the work ended (ISO 8601). |
| Cover image | An optional image for the hypercert card — URL or file upload. |
| Rights Information | Required information about the rights to this hypercert |
| Contributors (optional) | The people or organizations that did the work. Each contributor has an identity (DID or name), an optional relative weight, and an optional role description. You can add multiple contributors here or leave this empty. |
Step 3 — Add attachments
Attach supporting documentation that backs up the claim — reports, URLs, files, or other references. Each attachment becomes an org.hypercerts.context.attachment record linked to your hypercert.
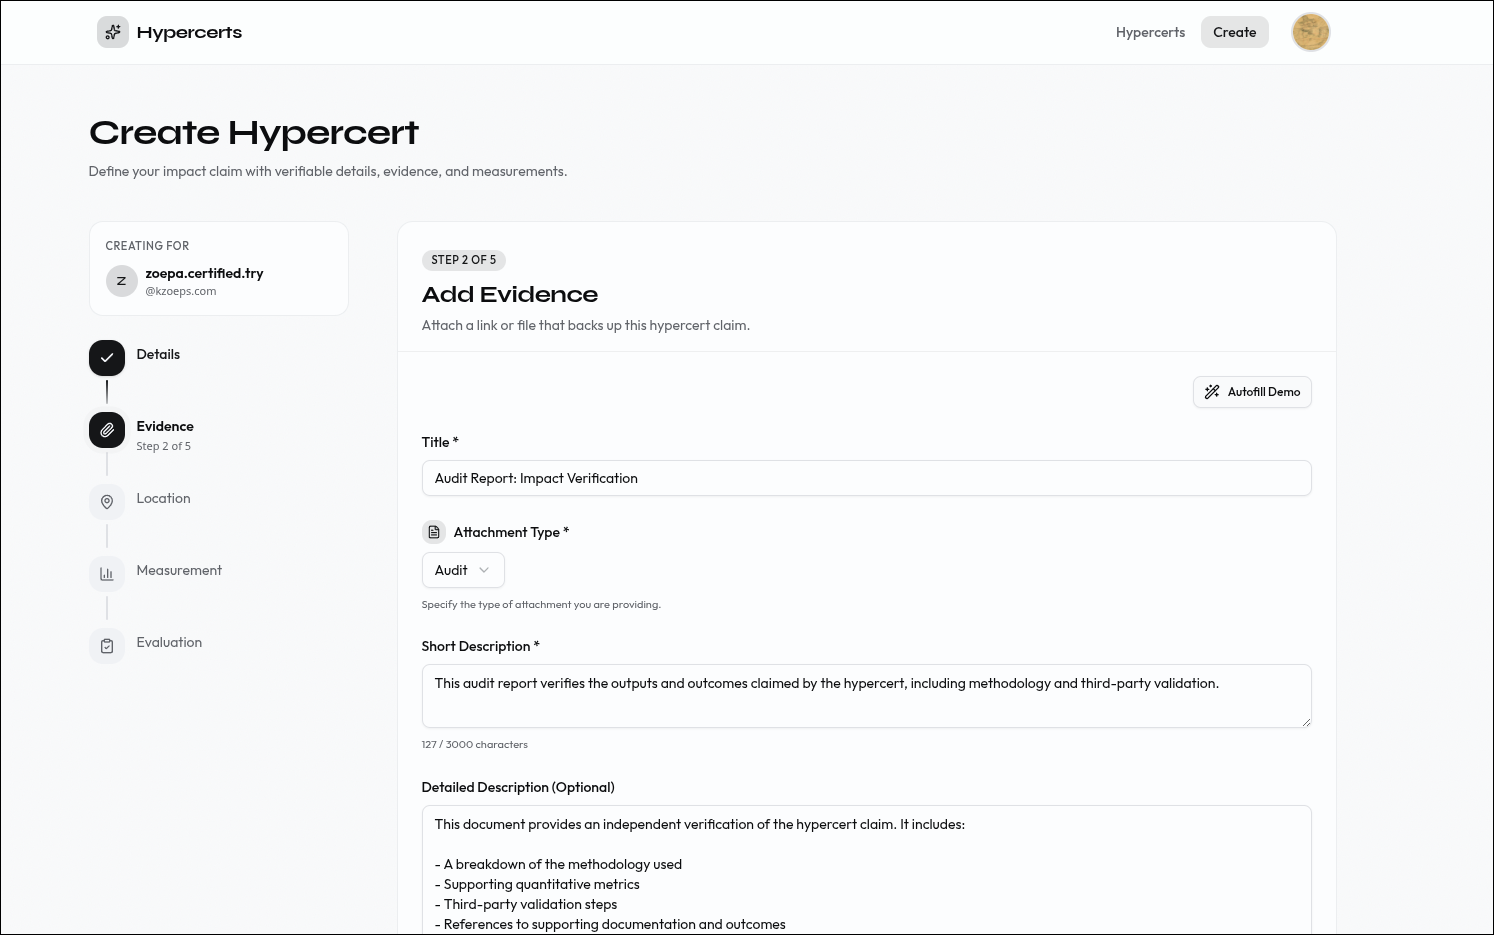 Step 2: Attach supporting documentation to back up the claim.
| Field | Description |
|---|---|
| Title | A label for this attachment. Max 256 characters. Example: GitHub repository. |
| Attachment type | The kind of attachment: report, audit, evidence, testimonial, methodology, etc. Max 64 characters. |
| Short description | A brief summary of what this attachment contains. Max 300 characters. |
| Detailed description | A detailed summary of what this attachment contains. (optional) |
| Content | One or more URLs or file uploads that make up the attachment. Max 100 items. |
Step 4 — Add location (optional)
Optionally anchor the work geographically. This creates an app.certified.location record referenced from your hypercert.
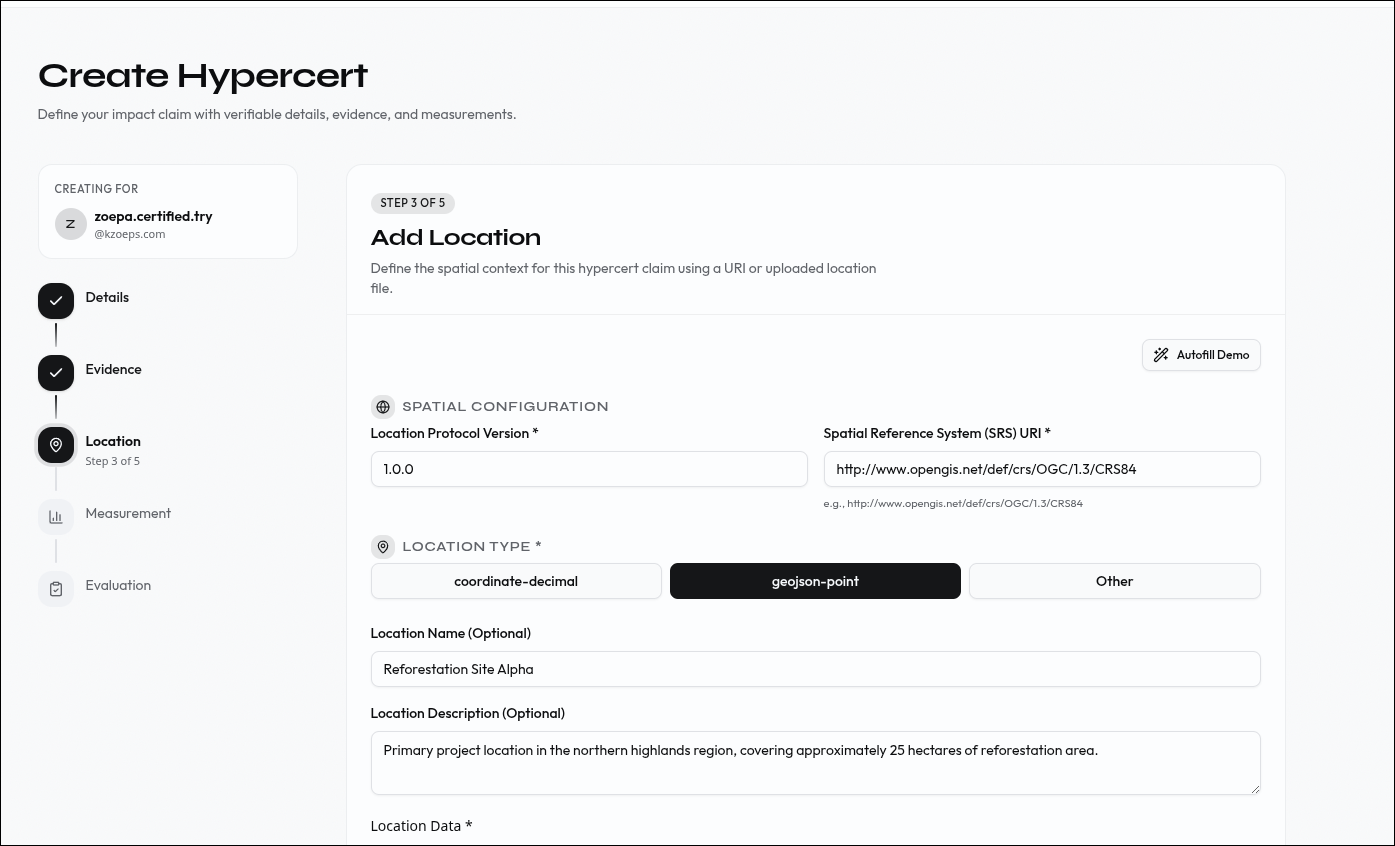 Step 3: Add location data to anchor the work geographically.
| Field | Description |
|---|---|
| Name | A human-readable place name. Example: Amazon Basin, Brazil. Max 100 characters. |
| Location type | The format of the location data: coordinate-decimal, geojson, address, h3, geohash, wkt, etc. |
| Location Data | The location data in the chosen format. Example for coordinate-decimal: -3.47, -62.21. |
| Location Description | Optional context about the location. Max 500 characters. |
Step 5 — Add measurements (optional)
Add quantitative data that makes the impact concrete — metrics, values, units, and measurement methods. Each entry becomes an org.hypercerts.context.measurement record.
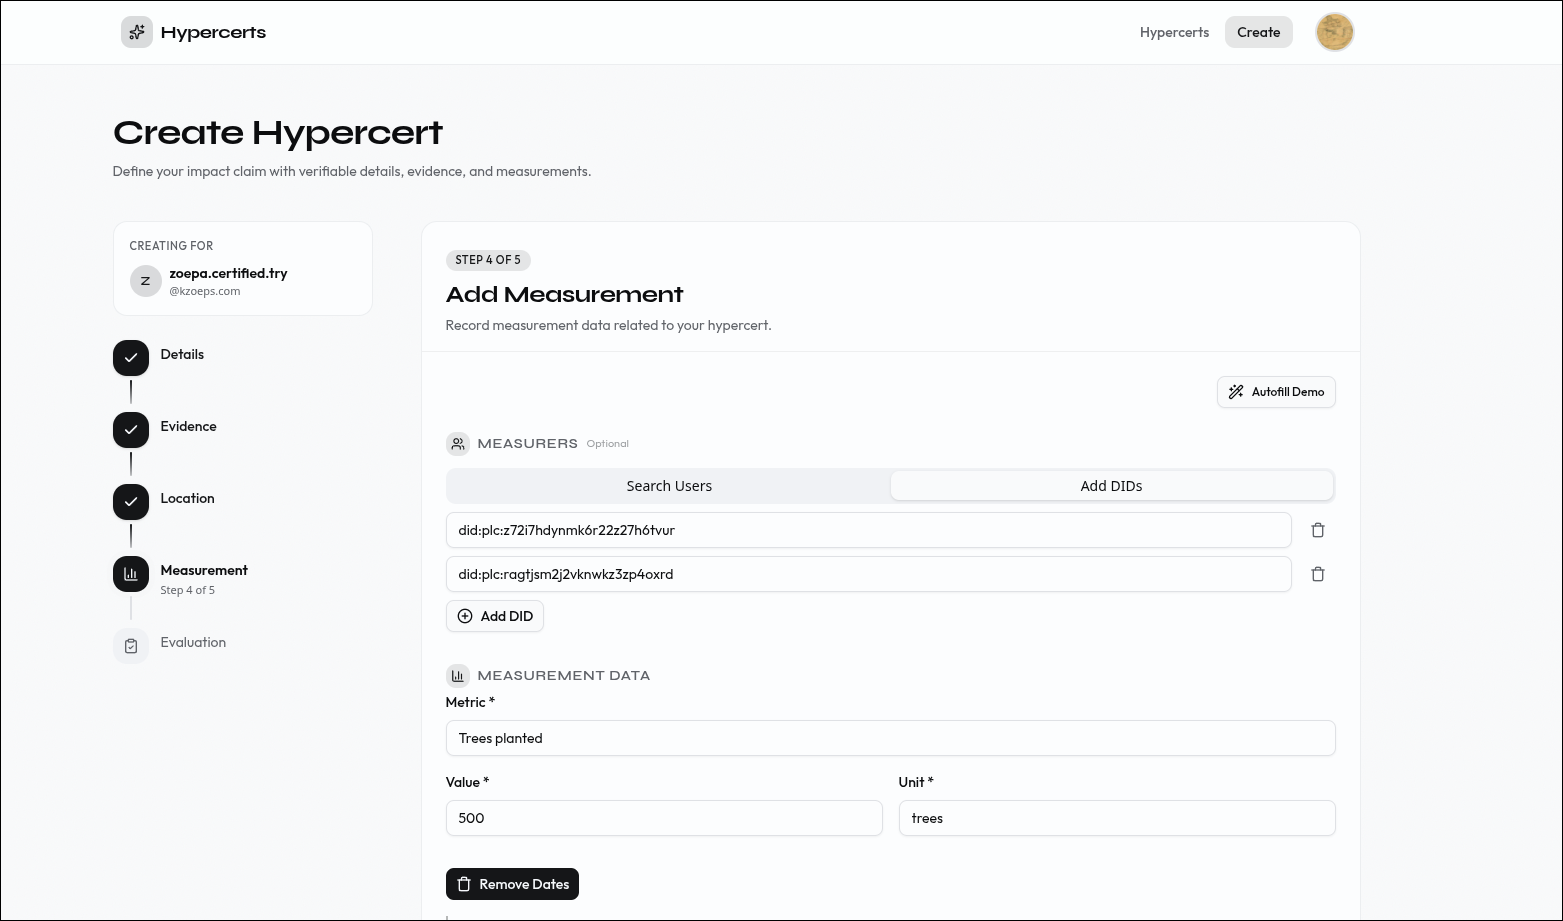 Step 4: Add measurements to quantify the impact.
| Field | Description |
|---|---|
| Metric | What is being measured. Example: pages written, CO₂e avoided, users reached. Max 500 characters. |
| Value | The measured numeric value. Example: 12. |
| Unit | The unit of measurement. Example: pages, kg CO₂e, hectares, count. Max 50 characters. |
| Start / end date | The period during which this measurement was taken. |
| Method type | A short identifier for how it was measured. Example: automated-count, manual-survey. Max 30 characters. |
| Method URI | A link to the methodology documentation or standard protocol. |
Step 6 — Add evaluations (optional)
Add third-party assessments of the work. Evaluations are authored by evaluators and can reference measurements. Each entry becomes an org.hypercerts.context.evaluation record.
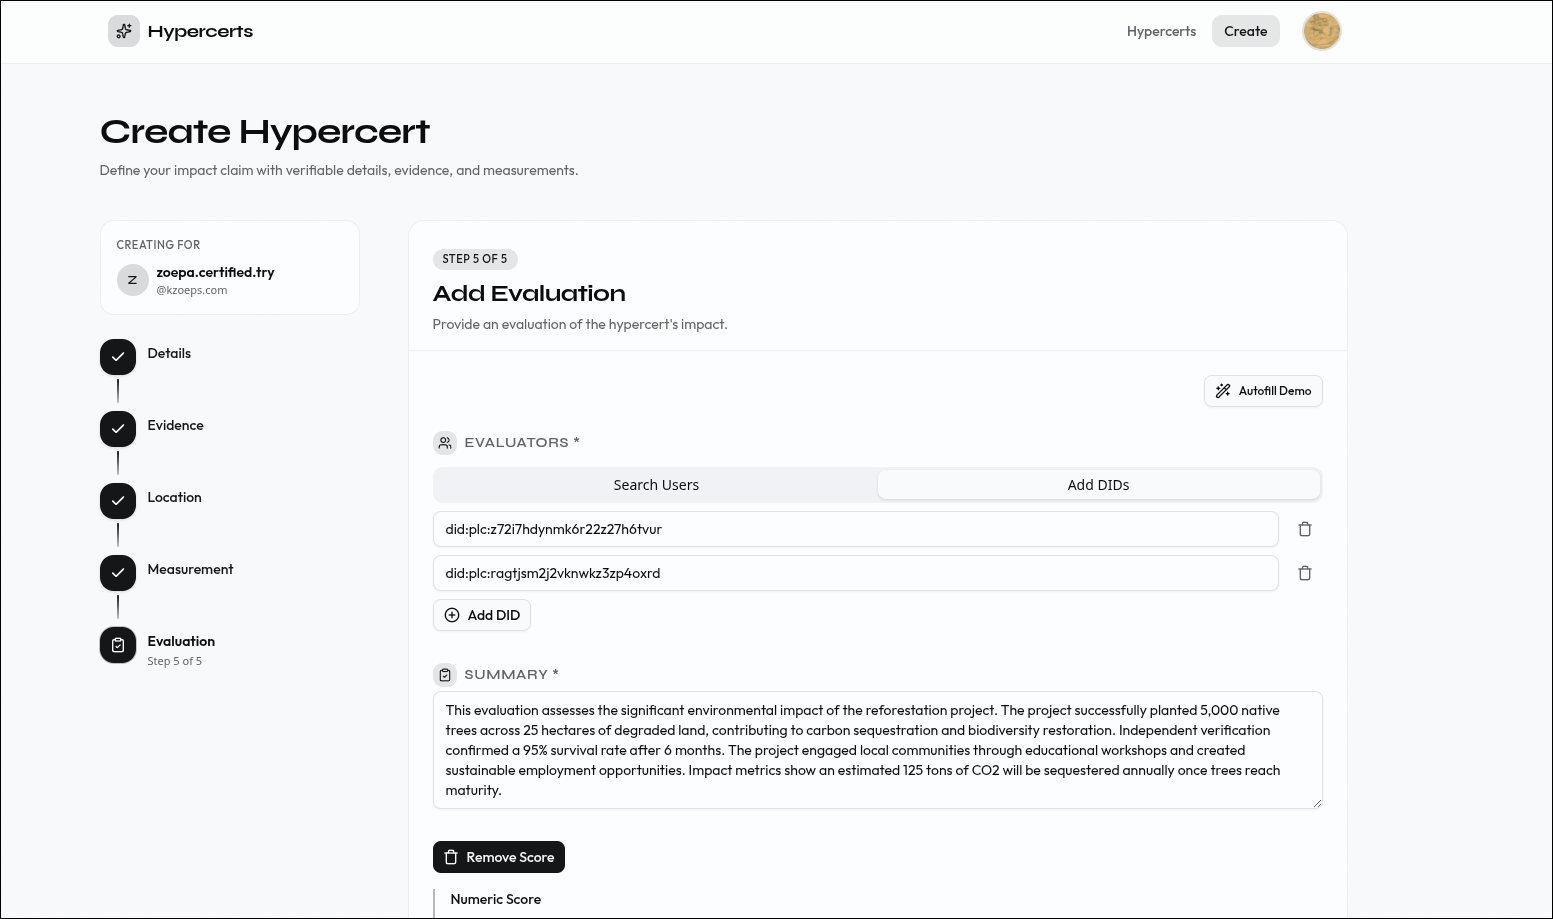 Step 5: Add evaluations from third-party assessors.
| Field | Description |
|---|---|
| Evaluators | DIDs or handles of the users who contributed to this evaluation |
| Summary | A brief written assessment of the work. Max 1,000 characters. Example: High-quality documentation with clear examples and thorough coverage. |
| Score (optional) | A numeric score on a defined scale. Set a minimum, maximum, and value — e.g. min 1, max 5, value 4. |
| Content (optional) | Links to detailed evaluation reports or methodology documents — URLs or file uploads. |
| Measurement (optional) | URI to the measurement tied to this evaluation. It can also be a normal URL. |
Step 7 — Done
Your hypercert is now created and stored on your PDS. The completion screen shows the finalized record — copy the AT-URI to reference it from other records (attachments, measurements, evaluations) or to share it.
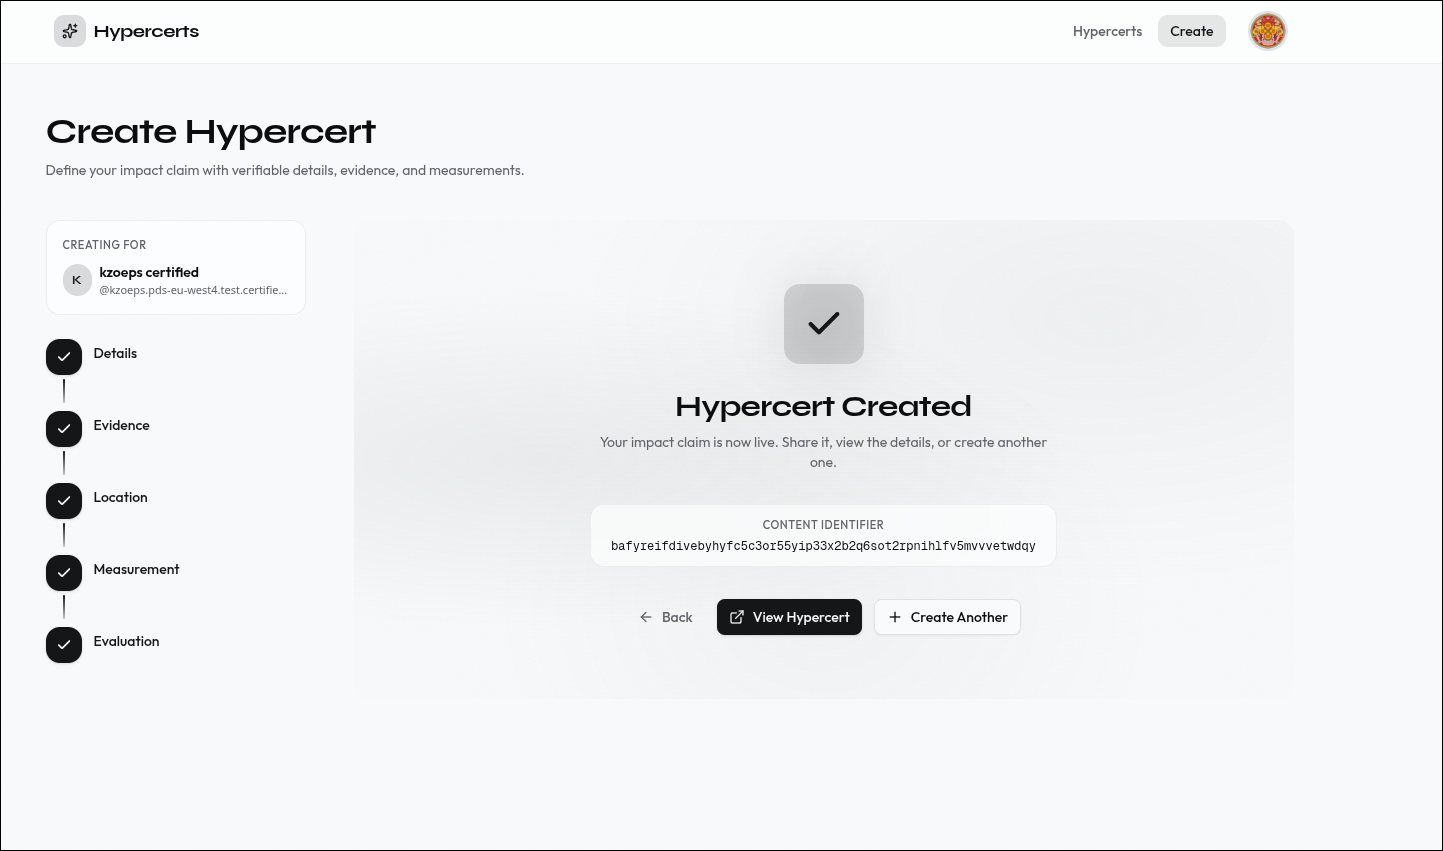 The hypercert is created and stored on your PDS.
For full details on the Scaffold app — including self-hosting, environment setup, and extending the codebase — see the Scaffold app documentation.
Next steps
Third parties can now evaluate your hypercert by creating evaluation records and measurements on their own PDS.